Showing posts with label kid pleasing. Show all posts

Saturday, September 1, 2012

Custom T-Shirts a La Freezer Paper

We painted up some wonderful t-shirts using the freezer paper stencil method. Brother-Bug had a friend over for the day, and knowing they would do better with a project to fill part of the day, I got some kid shirts and busted out my freezer paper.

Since we started making freezer paper t-shirts years ago, we have made or re-vamped many, many awesome shirts (and other articles of clothes). It is the rare item that does not turn out fabulous. There are sites upon sites dedicated to step-by-step DIYs for this craft, so I won't fill this page with those details.

You can Google "freezer paper shirt" and this page will come up. Of those possibilities, I like The Stay at Home Artist the best, but look around and see what you can find.

What I am writing about here is making these shirts with kids. With some preparation, it is a super easy project that even Sister-Bug could participate in, and yields a product that they feel really good about. Freezer paper shirts are great for giving new life to stained clothes. Brother-Bug's "new" elephant shirt was one we pulled out of his drawer; it was looking dingy and had a couple of unsightly bits. Carefully placing the elephant stencil over the stains made this old shirt new and exciting. I have saved plenty of clothes from the rag-bag with a little time and ingenuity and the appropriate application of a freezer paper stencil.

Essential number one: Pre-cut the stencil! This is slow and detailed work with a sharp craft knife. Better to get these ready during a quiet moment when excitement to get the project going isn't bouncing all around you.


Shirts in process - here we are waiting for the first color of paint to dry.
Essential number two: Don't conserve the freezer paper. It comes in huge rolls and if you cut the stencil out of the center of a large piece, the whole child's shirt can be tucked under the paper. Less smears, accidents, and other potentially sad incidents.

A birthday present for a spy/detective obsessed friend of Brother-Bug. 


Essential number three: Stick with one or two colors of paint, especially if you are working with younger children. In our project we used black to make outstanding silhouettes, and highlighted with the silvery metallic. Everyone was happy. We could have used my whole rainbow of fabric paint, but it would have meant a constant rotation of brushes needing to be washed, new paint colors to distribute, and so on. The older the kids, the more paint colors I will get out for play.

Sistre-Bug's shirt - she got a very basic stencil, the easier for her to paint. Yes, she painted this with very little help!


Essential number four: Have a thing to do while you wait for the paint to dry - away from the work space. While we waited we played outside. As soon as the paint was dry enough I pulled the paper off and carefully hung the shirts on a high laundry line. It's so hard for little fingers to resist checking the paint to see if it's dry.

Brother-Bug's renewed elephant shirt. So very cool.

When cutting out relief - like the insides of letters or the tracing of fairy wings, I have my own method. I'll attempt to describe it here, but I don't have pictures, so bear with me. In the past I always meticulously saved each little relief piece (the inside of the "D" in detective or each white piece in the fairy wings) and did my best to place them accurately.

See those wings? Each white bit needs to be saved and applied as its own piece. Meticulous and antsy work...

This time, I cut the wing relief in one piece, connecting each piece with a, eighth inch of freezer paper - truly stencil like. With the tip of my iron I anchored each piece in just one small area. Then with my thread-snipping scissors I went through and cut out the eighth inch connectors, leaving the true relief pieces in place as individual pieces. Once all the connectors were removed I ironed the true relief pieces down fully.

A couple more things:
*Make sure you follow the directions for setting the fabric paint. Most needs to be heat set with a dryer or an iron. Once it is well set these shirts are as washable as any other shirt.
*Pick something simple to start - words and fairy wings are very time consuming and potentially frustrating. If you haven't done this before, go for something fairly basic.
*I find it easiest to pull the paper off when the paint is barely tacky. When I've pulled it off completely dry paint it is much more difficult. Have a good pair of tweezers to lift of small paper bits.
*You can layer colors and even stencils! Your creativity and ingenuity is the limit here.

Look at this. They are so proud of themselves! And they look so sharp...

Have fun. Create well. The holidays are coming up... Who do you know who needs an awesome custom t-shirt?


Tuesday, August 21, 2012

Sushi Math

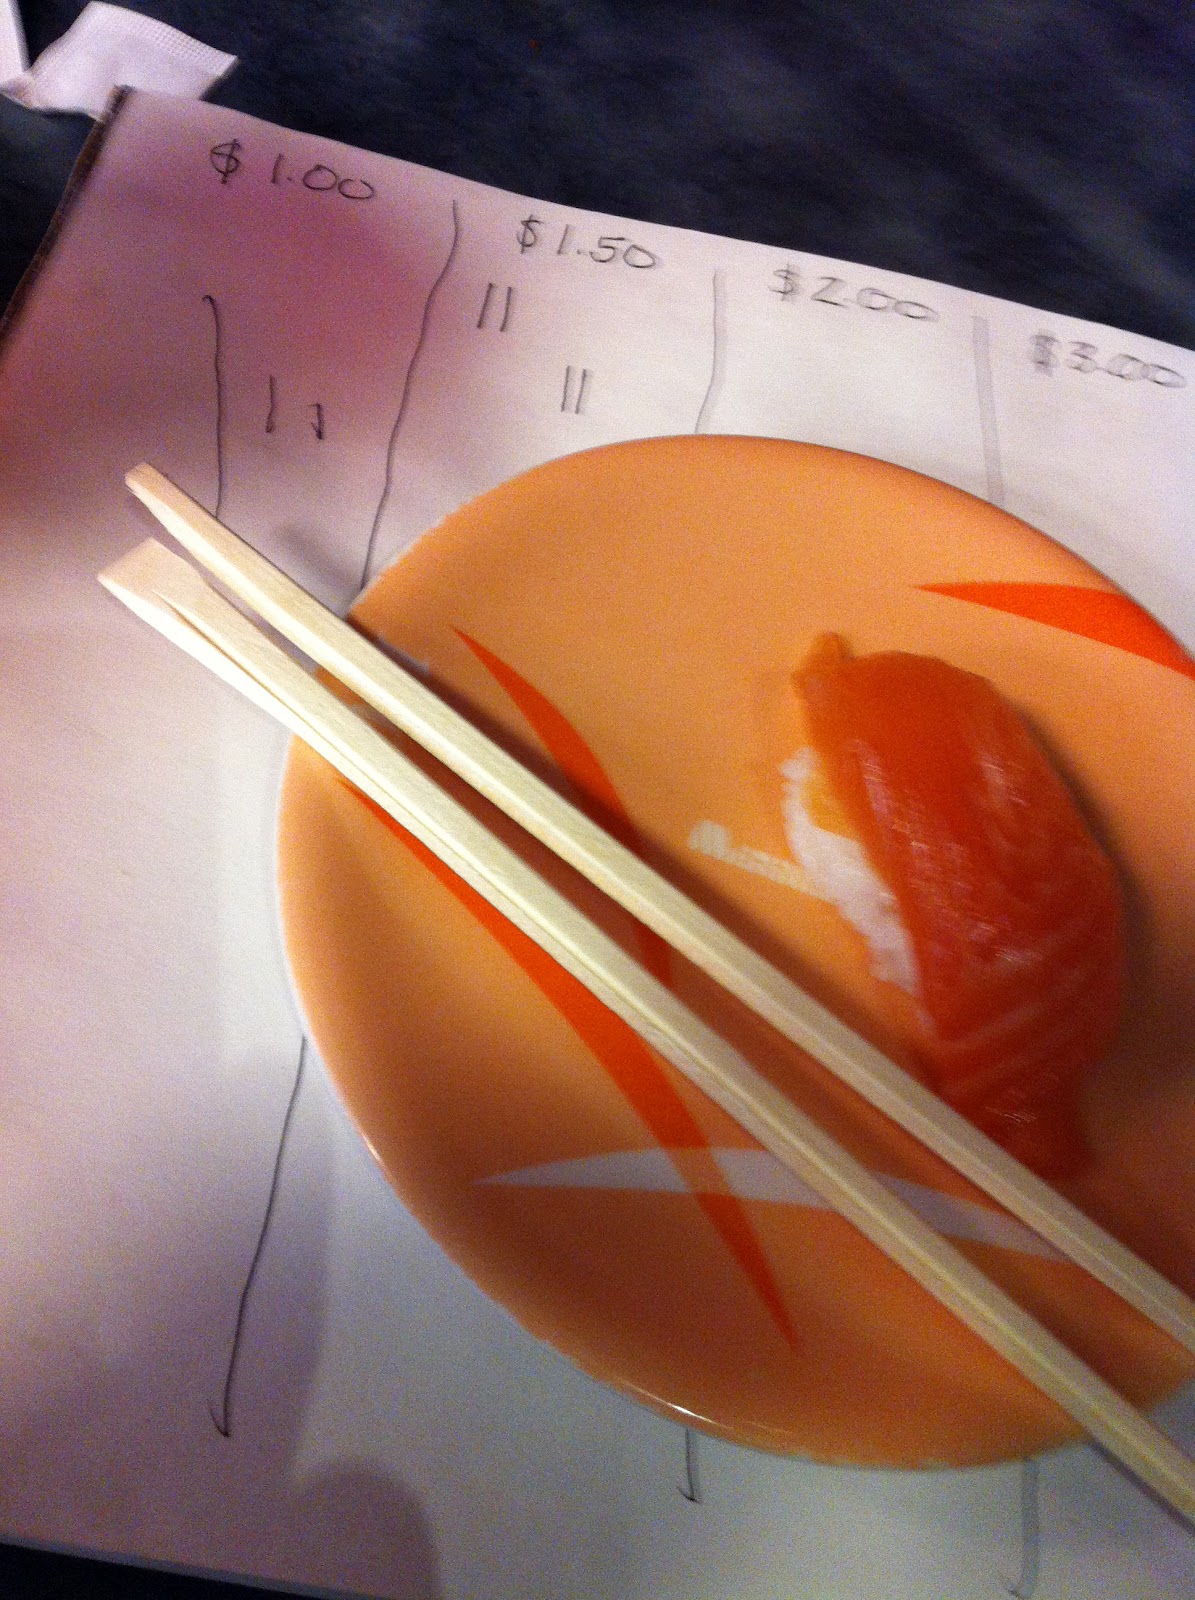
Brother-Bug's all time favorite restaurant is SushiLand - one of those sushi places where we sit next to a conveyor belt and sushi rolls past us in limitless quantities. He tries it all, enjoying some things that I just can't stomach. At our last trip to the sushi restaurant, I realized we had an excellent math game right in front of us.

There are so many possibilities. The plates are 1.00, 1.50, 2.00, and 3.00 each. You pick your plates and the waiter adds up your total at the end of your gorging. On this trip, we kept it simple, just playing with some of the many numbers we encountered.

What to eat next? Tuna? Salmon? Octopus?


I kept my plates in one pile, he kept his in another pile. We estimated who was eating the most by looking at the two piles. At first we tried to keep track of how many of each plate, making hash-marks on our paper...but we got to excited about eating sushi to keep up with that.

It was just too good to track while we were eating...

At the end of our feast, we counted up. How many of each plate? How can we figure out the cost of that stack? Who ate the most? (He did - he out ate me by one plate.) About how much money did we spend? Which plate - 1.00, 2.00 - did we eat most of? Least?

Brother-Bug starts counting. I ate 9 plates. He ate 10. 


It was an awesome math game.

There are so many places it could expand as well. Multiplication, division, quantity of individual rolls...  Mental math as we add up the total... I could give him $15 and he could figure out some budgeting... And going the other way, we kept Sister-Bug involved by having her do some basic counting practice - how many rolls are on this plate? Everyone was really happy, full of sushi, and enjoying finding a new math game out in the world.

Bonus! Sister-Bug works on her fine-motor skills with her chopsticks....

What other things could we do with Sushi Math? I guess we will have to go back...


Wednesday, July 18, 2012

Recipe: Spaghetti Carbonarra with Lamb Bacon

It amazes me that two years ago, I didn't even know that Lamb Bacon existed. It has won its way into my heart as a favortie meat product. I don't know where to buy it, aside from the Deck Family Farm, but if you are a bacon lover and in the Willamette Valley or Portland area... WOW. Try it out! It is intesnely flavorful and wonderfully fatty. It makes a killer BLT (especailly now that the tomatoes are getting ripe).

I wish I could upload the flavor for you. So very decadent

But our favorite thing to do with it? Carbonarra.


Frequently, Carbonarra is made with pancetta or proscuitto. Often people use pork bacon as the meat, but a good pack of Lamb Bacon really makes this dish something special. As a bonus, it's almost laughably simple to create.


Spaghetti Carbonarra with Lamb Bacon

Amazing ingredients for amazing dinner.
1 lb. Lamb Bacon
1 lb. fesh pasta (preferably a larger noodle like linguini. I used egg linguini from Pasta Plus.)

4 egg yolks
3/4 cup heavy cream (like the amazing raw cream from the Deck's Creamy Cow Share. Yum.)
3/4 cup parmesan, plus extra to sprinkle
Salt and Pepper to taste


Chop the bacon into small pieces and fry. Pull out of the grease and set aside. Save the grease - you'll need it later and want the leftovers for something else good.

Cook the pasta to al dente.

While the pasta is cooking, whisk the egg yolks, cream, and parmesan together. Drain the pasta and mix with the dairy sauce over low heat till the sauce thickens and clings to the noodles, about 3-5 minutes. Add the bacon and 2-4 tablespoons of reserved grease, mixing throughly. Season to taste with the salt and pepper.

Serve with a light salad or other veggie. Clearly this meal is the best kind of calorie fest, so keep your sides very light and simple. The Lamb Bacon has such a rich flavor you don't want to try and compete with it.

Also, if you do this and splurge on the Lamb Bacon... Go All The Way. Get really good pasta, cream, and eggs. Get local and raw if you can. I swear you will not be disappointed. It's worth it.


Tuesday, June 5, 2012

Recipe: Goat Ribs with Greek Potatoes

Not everyone eats goat, which is a shame. Goat is darn tasty and good for you. It's also the most eaten meat on the planet. I've found that if I am doing any ethnic cooking, I can substitute goat for beef...and suddenly the spice blends synthesize with the meat flavors in really wonderful ways.

The other night, having failed to locate my lamb chops, I improvised with the goat ribs I did find. If you can't find pastured goat in your area, try this with pastured lamb instead.

Bonus: There were some leftovers. I cut the meat off the bones and mixed the warmed meat & potatoes with scrambled eggs for a wonderful breakfast!

Goat Ribs with Greek Potatoes

Goat Riblets (about 2 pounds)
4-6 firm potatoes (red or yellow are best)
Butter or olive oil
Juice of 1 lemon
1 tbl. oregano
Salt & pepper
1 cup crumbled feta
1 cup kalamata olives, sliced in half

Chop the potatoes into 1/2 inch slices, and toss with butter/oil, lemon juice, oregano, and salt & pepper. Spread in a large baking dish. Reserve a little if the herbs and juice.

Rub salt, pepper, lemon juice & oregano into the ribs.

Place the ribs on the potatoes and cover. Cook at 350 for about an hour, remove cover and continue to cook for anouther 15 minutes. Remove ribs, let stand.

Toss potatoes with halved kalamatas and feta. Adjust the seasoning if necessary.

Serve with a spinach or Greek salad. Enjoy licking your fingers and gnawing the ribs.

===
Note: I got my riblet from the whole goat I bought from Deck Family Farm last fall. If you are looking for this cut, you should contact the farm (or your favorite purveyor of pastured goat if you aren't in the Willamette Valley) and see what they have. You could substitute chops or a roast, but cooking times would have to be adjusted.

Thursday, May 31, 2012

Recipe: Carrot-Mushroom Lasagna

Brother-Bug has long had a strong distaste for cooked carrots in almost all incarnations. However, last week I made a soup with grated carrots as a base and he was enchanted. He decided he wanted a lasagna with grated carrot as a main ingredient. I had to think about it for a while, but eventually I came up with this recipe. It's not at all a traditional Italian lasagna, but it's really tasty.

I used whole wheat lasagna noodles, but my preference here would have been to use fresh sheets of pasta. Sadly I was out of sheets, and didn't get to our favorite local pasta shop to grab some.

Carrot-Mushroom Lasagna

 1 pound lasagna noodles or fresh pasta sheets, cooked

2 cups milk
2 bay leaves
3 cloves of garlic, minced
1 sweet onion, chopped
4 cups button mushrooms, chopped
3 cups grated carrot
1/4 cup butter
1 tsp. dried basil
1 tsp. dried parsley (you can use fresh instead...I didn't have any fresh)
3 tbl. flour
1 cup grated parmesan cheese
Salt & Pepper to taste

3 cups grated mozzerella
15 oz. ricotta

Filling:
Heat the milk with the bay leaves until it simmers. Do not boil. Simmer for 2-3 minutes.

Melt half the butter in a large frying pan. Add the garlic, onion, and dried herbs and saute for 2 minutes. Add the mushrooms and carrots and cover. Cook on medium heat until the mushrooms have cooked down, releasing their juices. Add the rest of the butter and sprinkle the flour over the mushrooms. Stir the flour in till smooth, coating the mushrooms and carrots. Remove the bay leaves from the milk. Pour the milk over the mushrooms, stirring throughly till smooth. Stir in 3/4 cup parmesan cheese. Add salt & pepper - because there is no salt added to the noodles or ricotta, you might want to over salt the filling a little bit.

Assembly:
Preheat the oven to 350.

Grease a baking pan. Stack a layer of noodles, 1/3 of the carrot-mushroom filling, and a sprinkle of mozzarella. Spread another layer of noodles and spread the ricotta over. Pour the next 1/3 of the carrot-mushroom filling over the ricotta. One more layer of noodles, the remaining carrot-mushroom mixture, and the rest of the mozzarella and paremesan. Bake in the oven for 45-60 minutes, or till the cheese is golden. Allow to cool for 10-20 minutes before serving.

We served this with a spinach salad. As I was making it, I was unsure. Carrot lasagna? Really? But it turned out really good. Everyone enjoyed it and cleaned their plates.


Tuesday, May 22, 2012

Recipe: Southwestern Bean & Chicken Soup

This soup is super fast and easy once your beans are ready. The spice is easily adjusted at the table with your favorite hot-sauce, and the salsa cooked in gives a wonderful tangy flavor. Also, adding the salsa means that there are no fussy things to cut up - so it is a great one to get a young child to help with!

Just the right soup for a rainy spring day - light and warm.
I used Lonesome Whistle's Arikara beans. They are a nice white bean that hold their shape really well in longer cooking projects such as soup. They have a balanced flavor that (so far) goes with everything. It's been nice to be back at the Farmers Market and seeing Kasey, talking beans and grains with her, and looking over her booth. It is more luscious and full each year.

Anyway...recipe!

Southwestern Bean & Chicken Soup

3-4 cups soaked and cooked Arikara beans (or another white bean)
1-2 cups cooked chicken pieces (this is a great thing to do with leftovers from a whole roasted or rotisserie chicken)
4-5 cups chicken broth
1-2 jars of your favorite green salsa
2 tsp. cumin
1 tbl. corn or tapioca starch
Salt & pepper to taste
1/2 cup chopped fresh basil or cilantro

This is so easy it feels like cheating. In your soup pot, combine the broth, beans, and chicken. Bring to a simmer. Add the salsa. Pull out a little broth (2-3 tablespoons should do it) and whisk in the starch and cumin till there are no lumps. Gently stir it back into the soup. Allow to simmer and thicken. Just before serving, add the basil or cilantro.

Serve with corn chips, sour cream, green onions, and your favorite hot sauce.

Wednesday, May 9, 2012

Recipe: Crackling Cheese-Chive Muffins

"Warm and plump as fresh baked muffins..." (Charlotte Pomerantz)
This morning called for something more than cereal or scrambled eggs. The day called for Muffins. So Sister-Bug and I whipped up a batch while Brother-Bug slept in.

Two other excellent reasons to make muffins:

1) You have sour milk. Like I wrote about here, sour milk has a magical effect on the consistency of baked goods like muffins, quick breads, and pancakes. And why waste that potential?

2) Mixing muffins is an easy project to do with a little kid. Muffin batter is very flexible and forgivable. Once you get a general recipe down you can add and subtract, and your toddler can pour in too much baking powder...and you can still save it and come out of the experience (usually) with something edible.

These are our favorite muffins, and a wonderfully flexible recipe. Because they are savory they make a good addition to any meal and I've seen them disappear at many potlucks. My mom made a similar muffin when I was young and I've kept it and adapted it for our days when we just need muffins for breakfast - like today.

I used Lonesome Whistle's Red-Fife Wheat Flour and Buckwheat Flour which gave this particular batch of muffins a particularly rich flavor and a wonderful crumb. The millet is for texture fun (as well as the wonderful nutrition found in millet). As the muffins bake, the millet softens a little and toasts which is what makes these muffins "crackling" - the millet pops while you chew which is really fun! You can use any flour combinations, but at least 1 cup must be a whole grain flour or the texture will be really strange. I like a sharp cheddar and chives best, but only fresh chives. However, any combination of cheese and herbs will work, and it's fun to play with flavor potential.

Sister-Bug considers the implicatons of muffin batter.

What else could you add? Bacon or ham bits? Blue cheese instead of cheddar? Roasted red pepper bits? Flax seeds, bran, wheat germ, or other nutritional delights? Rye flour and caraway seeds? So many possibilities.


It's the fresh chives that really make this recipe so good.
Crackling Cheese-Chive Muffins

2 cups flour (combined whole wheat, other whole grains, and a little white to keep it light)
4 tsp. baking powder
A pinch of salt
1 1/2 cups sour milk or thinned yogurt
2 eggs
1-3 tbl. fresh chives (or other herbs)
2/3 cup millet
1 cup grated cheese (sharp cheddar or ??)
3 tbl. melted butter (or vegetable oil)

Preheat the oven to 400 degrees.

Mix the dry ingredients and make a well. Add the milk and eggs and beat throughly. Add the chives, millet, and cheese mixing till just combined. Stir in the butter.

Spoon into muffin tins and bake until a toothpick comes out clean - about 20 minutes. Eat warm, eat cold, eat plain, eat with butter... Just eat them quickly before your kids inhale them!

Just coming out of the oven...

Baking in Cast Iron? I always bake my muffins in my cast iron pans. They are a bit of an investment, but they are really worth it! Preheat the pans with the oven and use a basting brush to grease each muffin cup. Spoon in your batter and bake as usual. Because your muffin cups are hot iron, they bake the bottom of the muffin - making the whole muffin crisp around. And as long as you wipe them up right away and don't use soap on your cast iron (EVER), they are clean and back in the cupboard very quickly. 


Tuesday, May 8, 2012

The Flavor of Milk

Sister-Bug drinks her fresh milk in the dairy barn at Deck Family Farm.
We drink raw milk. We are blessed to have many local farms and friends that choose to leave their milk in its whole and most nourishing state.

Because of pick-up issues we took a break from raw milk, getting regular old organic carton milk at the store. Our busy life being what it is, I forgot. Then, out at the Deck Family Farm the other day, we pulled cups of fresh, cold milk from the big milk tank. The flavor hit me, deeply resonating as food, nutrition, satiation. One sip and I could feel my body respond to the goodness of it.

We're back on raw milk now.

There is tremendous controversy around the benefits versus the safety of raw dairy products. I don't need to address that controversy here and now. You know what side I am on. I'm on the side with the good flavor - that my body deeply and viscerally recognizes as Food.

You can find out more about the benefits (and some of the risks) of raw milk here:

Raw Milk Facts 
Raw Milk Risks & Benefits
Health Benefits of Raw Milk

Selling raw milk is illegal in most states. Find out how to legally buy it here.

If you live in the Eugene/Springfield area, check out the Deck Family Farm's Creamy Cow Share.

Ever thought of making cheese? The less pasteurization the milk is exposed to, the better your cheese product. Fresh raw milk makes the best fresh mozzarella - and it is almost tomato & basil time....

And one final thought about milk. Many people tout the benefits of whole food, eat whole grain bread and leafy green veggies. At the grocery they stock up on 2% (or skim) milk and low fat yogurt. That dairy has been altered and processed to have some of its nutrients removed. It's not a whole food. Just a thought.

===

Because I love and revere local food, and whole food I really enjoy writing about the cooking and experiences I have. I work at the Deck Family Farm booth at the Lane County Farmer's Market and we eat almost all Deck meat. As the Lonesome Whistle feature slows down, I plan on featuring more Deck products and writing about pastured meat - because cooking it is a little different than cooking feed-lot meat! And it's all just so very tasty...

Tuesday, March 6, 2012

A Yummy Bowl

Here is the Willamette Valley we have a local chain called Cafe Yumm. Their Yumm Bowls make up a fair part of the kids eating-out experience. They key is their amazing Yumm Sauce. Tasty.

But we can't afford to eat out often, and I love to make things myself. A dear friend gave me her recipe for what she calls Yummish Sauce. Be patient, we will get there.

A Yumm Bowl spread is a great thing to serve to large groups of diverse eaters, especially when kids are involved. It's super basic and pretty much infinitely adjustable. It falls into the 3 Gs without any effort at all.

Here we go, from the bottom of your (large) bowl up:

Greens of some kind - mixed salad greens, cooked kale, chard, or collards, spinach, steamed nettles, steamed broccoli....

Cooked grain of some kind - brown rice, millet, quinoa, wheat berries, barley, corn chips.... Or skip the grain if you don't do grain.

Cooked beans - our last bowls had Lonesome Whistle's Rio Zapé beans. So good. But any bean will do. Black, white, red, pinto, cranberry, garbanzo...

(You begin to see how infinitely adaptable these are, right?)

Okay, that's the base. Traditionally this is vegetarian, but I've been known to throw in left over meat that was available - some slow-cooked chipotle goat leg was incredible. Extra taco or burrito meat, turkey, chicken, whatever. I think pulled meats work better than others, but that's more of an aesthetic choice than anything.

All kinds of other stuff goes on top:

Cheese
Sour cream
Green onions
Avocado
Salsa
Black Olives
Tomato
Fresh Basil or Cilantro
More greens
Jalapenos
Bell peppers
Anything else your imagination inspires you to try...

On top of all that, we slather on the Yummish Sauce. Mix it up (or not - your preference) and watch it get inhaled out of the bowls.

What? The Sauce recipe? But of course!

Yummish Sauce

This makes about 2 1/2 cups, which we will use up in a couple of days. However, it freezes really well, so making a little extra (or a lot extra...I usually make about a gallon at a time) and popping containers in the freezer means having a go-to snack and dinner option.

Blend in a food processor:
1/2 cup oil - I usually use Olive Oil
1/2 cup almonds
1/2 cup cooked and drained garbanzos
1/4 cup soy beans
4-6 garlic cloves

(I've successfully used cashews in place of the almonds, and other white type beans, like Arikara Beans, in place of the garbanzos and/or soy beans. Like the bowl recipe, this is only limited by your imagination and what is in your cupboard.)

Slowly add, one at a time:
1/3 cup nutritional yeast
1/2 cup water
1/3 cup lemon juice
1 tsp. salt
1 tsp curry powder
1 tsp. soy sauce or Braggs Liquid Aminos

(Here I have tried other herbs and spices. When Sister-Bug had broken her clavicle, I blended up a bunch of sauce with Comfrey tea and leaf for its bone healing properties. I plan on putting nettles into the next batch...and who knows what else!)

Blend well with each addition. Adjust the salt and spices as desired. Adjust the thickness with water and oil - I like to make mine like a thick dip, knowing it's easy to thin later and makes a nice dip or sandwich snack if it's a little thicker.

This is a guaranteed kid-pleaser...or has been with every kid I have ever fed it to!

Rio Zapé Bean Dip

I'd never made bean dip before. So, after tasting the dark and rich flavors of Lonesome Whistle's Rio Zapé beans, I thought it was time to give it a whirl. Here's what I came up with:


Rio Zapé Bean Dip
2 cups cooked beans - if you don't have Rio Zapes, try a black bean
1/4 cup chopped onion (or less - mine was a little to onion-ish)
2 cloves garlic
2-3 tbl lime juice
1 tsp each smoked paprika and oregano
1/2 tsp cumin
4-8 green olives
Cayenne or other hot pepper to taste
Salt to taste
Olive oil to blend

Put all the ingredients into a good processor - reserving the olive oil salt, and half the lemon juice. Blend well. Slowly pour in the olive oil while blending, checking the consistency often. When you like the consistency, adjust the flavoring with lemon, salt, additional green olives, and peppers.

Dip chips, add to nachos, sandwich spread?? Enjoy!

Tuesday, February 21, 2012

Recipe: Sweet Potato & Beef Stew

Here's the thing - I'm not usually a huge fan of your standard beef stew. It's okay, but the flavor combination never enthuses me. So I set off a couple of days ago to do something different. And I did - it is still stew and has many of the qualities of stew that we all know and love. But the flavors are new, to me anyway.

Sweet Potato & Beef Stew with Caramelized Onions

2 onions
1/2 stick of butter
4 cloves of garlic
1 pound stew meat (or chuck cut into cubes)
1/2 cup flour
1 leek
1 large parsnip
2 sweet potatoes or yams
4 cups beef broth
2 bay leaves
Rosemary, salt & pepper to taste

I used my slow cooker for this, but it should be easily adaptable to stove top.

Night before: slice the 2 onions and toss into the slow cooker with the butter. Set on low for 8 hours. Wake up to Caramelized Onions. This is a good thing.

In the mid-morning: cube parsnip, sweet potatoes, and slice leeks. Mince the garlic. Dredge the stew meat in flour and brown in a skillet with the garlic. Place veggies, meat, herbs, and beef broth in the slow cooker. Cook on low for 6-8 hours.

Taste and adjust the seasoning. Serve with crusty bead and salad.

Saturday, February 18, 2012

How To Make A Jellyfish

Last year Brother-Bug was interested in jellyfish. We got books out of the library and delved. The eventual result was a large jelly that hung from our ceiling for months.We found it recently and hung it up for our month of studying Oceans and Marine life. It looked really good with our oceanic windows.

It is a very simple project. You will need:
A large piece of bubble wrap
A piece of colorful cellophane (usually sold or found as a gift wrap supply)
Lots of clear or white twist ties
A good plastic bonding glue
Scissors

Optional - a pack of silver rik-rak and small colorful cards.

Cut a large rectangle of bubble wrap - approximately 12"x36". Glue the 12" side together making a cylinder and let the glue dry thoroughly.

Using the scissors, snip holes around the top and bottom of the cylinder, abut an inch down and 3/4 of an inch apart. Thread one twist-tie through the homes, gathering up the cylinder. That's the top of your jellyfish.

Crumple the cellophane and put it in the gathered cylinder. Use a twist-tie to gather the bottom closed. Squish the cylinder flat-ish to make the jellyfish "head".

Cut tentacles out of bubble wrap - about 24" long and 1-2" wide. Use the scissors to poke a hole in one end of each tentacle and around the bottom of the "head". Use a twist-tie to secure each tentacle in place.

Optional Rik-Rak: tie long strings of silver rik-rak to the bottom center, using the gathering twist-tie as an anchor. Some jellies have two kinds of tentacles much like this.

Optional Cards: we wrote some of the facts we learned about jellyfish on small cards and stapled one card to each tentacle.

Hang in a window to catch the light! I imagine how cool it would be to make a lot of these and float them on a large room... Maybe lighting the cellophane with LEDs...

One bubble-wrap jelly fish.

Sunday, January 22, 2012

Adventures With Purple Barley

Last night I put 2 cups of Lonesome Whistle's Purple Barley and about 6-7 cups of water in my slow cooker. I've been meaning to try this since my success with the Scottish Oats in the slow cooker. Right before I went to bed I set it on low for 8 hours. This morning - warm and tasty barley cereal ready to go! We added butter, milk, and sweetener as we served. Some of us had it with honey, some with molasses, and some with brown sugar. Everyone enjoyed it - even Sister-Bug who often refuses to eat things that don't have Gorgonzola in them. This is one of my new favorite ways to deal with breakfast and my hungry little bugs who often can't even wait for eggs to scramble! How perfect to have breakfast ready to go, the moment they are up and clamoring for food.

A red bowl of slow-cooked purple barley.

My other success with the purple barley was the following recipe - made up largely because my mom gave me a container of Mascarpone and I didn't have any immediate inspirations of what to do with it. Leafing through old cookbooks I found a recipe for risotto with Mascarpone and Pancetta. The idea struck my fancy, and this recipe was the result. It seemed to be kind of a risotto/pilaf hybrid and I'm just not sure what to call it. It is amazingly rich and warming. Papa-Bug, in particular couldn't have enjoyed it more. 

Decadent Barley with Mascarpone

1/2 onion
5 tbl. butter
2 cups purple barley
1/2 pound ham cubed (I used a nitrite-free ham slice from Deck Family Farm...soooo good)
5-6 cups chicken broth
8 oz Mascarpone cheese
4 tbl. Fresh parsley
5-7 Green onions

Heat the butter in a large, heavy bottomed frying pan. Chop the onion and saute until clear. Add the barley and continue to saute for another 5-7 minutes (in making risotto you wait for the rice to look 'clear', which didn't happen with the barley).  Add the ham and toss to combine. Add the chicken broth and cover. Bring to a boil, reduce to simmer, and cook until the barley is done through - this took about an hour. Remove from heat and allow to cool for 15-30 minutes (this is essential, as it keeps the Mascarpone from separating too much). Just before serving, mix in the minced parsley and green onions and the Mascarpone.

My thanks go out to my mom for putting the Mascarpone in my fridge, causing the creation of this pleasing recipe!

Thursday, January 19, 2012

Adding To The Pasta Sauce

This is not my kid... I just love this picture.
Frequently spaghetti and sauce graces our table - as I'm sure it does on many other tables. It's fast, a reliable kid-pleaser, and fairly hearty. However, serving spaghetti, tomato sauce, and a salad does not include that essential G for Growing - protein. Not in any amount substantial enough to satiate a nursing mom anyway.

I was making pasta sauce the other night and hit upon the idea of using some cooked beans leftover from a previous dinner. The whole sauce was based around what I had that needed to be used - eggplant and what not. On the whole, it worked out really well. I could have added zucchini, spinach, or any other veggies if I had them. The beans and cream gave the sauce a richness and a velvety texture not usually found in a veggie sauce. Added benefit - the kids liked this sauce way more than they like plain red sauce!


Vegetable-Bean Pasta Sauce

In olive oil sauté
1 onion - chopped
3 garlic cloves - chopped
2 sm. eggplant - cubed
(other veggies would go here)
Basil
Oregano
Parsley

Add
15-20 oz. canned tomatoes
1 c white wine
1 c water

Cook until the vegetables are soft through.

Puree in a food processor with
1 1/2 cups cooked red or white beans (one can of beans would be fine too)
1 cup cream
Salt and pepper
Until everything is blended together. Adjust the thickness of the sauce with water reserved from cooking the pasta.

Pass with asiago.

Added possibility - adding extra beans and a half cup of asiago will make a thick Italian style bean dip! Tasty on bruschetta...

Monday, January 16, 2012

A Warm Mug

After a run in our paltry half inch of snow (pretty for sure, but disappointing for Brorher-Bug) we came inside and a hot drink was in order. Often we go for cocoa on snowy days, but today Papa-Bug made his favorite from childhood.

POOH DRINK (Makes 4 Mugs)

4 cups Milk
1/4 to 1/2 cup Honey (to taste)
1/2 tsp Fresh Ground Nutmeg
2 Eggs

Beat eggs thoroughly, set aside.

In a saucepan, heat milk over medium-low heat, stirring constantly, until it simmers. Add honey and half the nutmeg. Stir.

Slowly add 1 cup of the hot milk to the eggs, stirring as you add it. Then add the eggs with the milk back into the saucepan and bring back to a boil, stirring constantly.

Pour into mugs and garnish with the remaining nutmeg. For kids, put the mugs in the freezer to cool for 5-10 minutes, until drinkably cool.

Friday, December 30, 2011

Overnight Oatmeal

I got a new slow cooker for Christmas. It was time. I was using my mom's old hand-me-down and the small crack in the crock was getting bigger... and wiggly... and soon would not be so watertight. I'm thrilled with my new one. It programs to turn to warm after a set time, so whenever I cook it, the food stays warm, but doesn't over cook. I love it.

With my delivery of beans and grains from Lonesome Whistle there was a bag of Scottish Oats. The instructions call for giving them 30 minutes to cook stove top, and it's rare that I get a full 30 minutes to cook for my hungry tigers in the morning. But with the slow cooker...

Put 1 cup of Scottish Oats and a pinch of salt into a slow cooker with 5 cups of water (yes, this is a cup more than Kasey's instructions call for) at bed time. Set to Low for 8 hours. If you have a timed cooker it will switch to warm in the night, or still be slowly cooking when you get up. Regardless, when you get up, there will be warm oatmeal, ready to go.

The only disclaimer I feel I should add is that because of the long, low cooking time the oatmeal ends up more gooey than some people might like. We didn't mind at all. 

This is the perfect thing to do the night before a busy morning. Add some raisins, cashews, maple syrup...

I'm going to try it with barley next. I love barley cereal.

Saturday, October 29, 2011

Simple Saturday: Independent Snacking

One of the things that can drive me crazy is how the Little Bugs always seem to get hungry the minute I have gotten my hands deep in a project, sat down to nurse, or just opened my book. I know I shouldn't get peeved - they are growing and they get hungry and that's okay.

But really? I just started writing this! Two minutes ago I was in the kitchen, digging through the fridge, and you couldn't want a snack then?

In answer to this, I decided to simplify and empower. To do this I got a smaller selection of snacks, focusing on nutritional and flavor balance as well as things I was okay with both kids eating whenever. Then I got three plastic containers with lids that Brother-Bug can easily open.

I keep these bins in a low cupboards, and/or on the bottom shelf of the fridge. Brother-Bug can help himself anytime he is hungry - and he usually takes on sharing with his sister as well.

I keep refreshing the snacks as they need it, and I usually put two different things in each bin. One might have fruit leather and nuts, one crackers and nori, and one carrot and green bean pieces. I try to stick to our concept of The Three Gs as my guidelines. If there is something sweet like fruit leather, they have to eat everything in the bin, not just the sweetie) before that bin is replenished.

Some things I have packed in these bins: cheese and meat bites, seaweed, assorted nuts, chips, crackers, freeze dried fruits and veggies, cooked chickpeas, fresh carrots, peas, celery, or green beans, tofu dip, yogurt, dried fruit, carrot & beet chips, trail mix...


I'm having fun finding fun snacks to diversify their bins, and also finding a special surprise snack occasionally. I think they are both learning about meeting their own needs, saving the sweets so they last (delayed gratification), and a little nutrition. When I do go to get a more prepared snack, I find that I am more inspired to make it fun a different because it's something I do once a day instead of three or four times a day.

And when someone comes in the middle of my writing time, I can easily remind them that the snacks ate within their reach.

Tuesday, October 25, 2011

Housekeeping Week - Tuesday

On Tuesday I have to be at our food co-op for my volunteer shift by 4:30. I also have to get dinner in the slow-cooker so Papa-Bug and the kids can eat dinner easily while I'm gone. I get home right before bedtime, just enough time to feed myself and hear how the evening was. So I need the Tuesday chore to be pretty simple and one that won't be really noticed if I miss it.

Tuesday is the day we clean the Playroom.

To get it just good enough, we
*pick up the toys off the floor.
*make the bed.
*put the laundry away.

If we are all feeling cooperative (and it wasn't too big a mess to start with!) we also, ultimately, can
*sweep and wash the floor.
*get the toys put in their proper homes.
*wash the sheets (since the kids sleep with us, I don't worry about that so much).


Also on Tuesday I water the houseplants. It's not a big deal, so I easily forget to do it - unless it is on the schedule.

Having the playroom clean on Tuesday means that Papa-Bug has a nice play space for his evening with the kids. And, like I opened with, Tuesday can get a little crazy, so this is a pretty mellow thing to get done.

Another aspect of the kids room that I recently added is the style of their toy storage. I found that a local ice cream parlor gives the sugar cone boxes away. These make for cheerful, standardized storage. The lid is perfect for writing what belongs in the box - and even if the contents are a jumble, the outside looks tidy.

===

Housekeeping schedule benefit! Having a small thing, like watering the plants, gives me something I can do first thing and feel accomplished right away in the morning.

Friday, August 19, 2011

Flavlorful, Yet Still Tasteless

I'll just open by stating categorically that my family has an off-the-hook sense of funny. And we'll leave it there.

Last weekend it fell to me to make the birthday cakes for a birthday party for both brothers. They were both in town on the youngster's actual birthday, and the elder had his about 2 weeks prior. So the whole family gathered in a local park and celebrated with fish tacos and cheesecake.

At the library, Brother-Bug and I were perusing the children's cookbooks. We found this excellent book, Gross-Out Cakes, and just had to bring it home. Parts of it are truly disgusting.

I lean more toward wanting to make the Oozing Brain or Severed Arm. I'm not sure I could even begin to stomach eating the Kitty-Litter Cake.

We read through it several times, and finally settled on the Road Kill Cheesecake. We thought it was the least likely to offend anyone who wouldn't find stuff like this hilarious.

One chocolate cheesecake, some icing and sprinkles, a little Lingonberry jam, and a toy deer later...


It was a complete success. Everyone loved it and it was so yummy!

And I highly recommend the book to anyone with kids who love the silly, macabre, or downright disgusting.

Monday, August 8, 2011

Blueberry Day

Today, on a cool, slightly damp day, we adventures out to Adkin's Farm for blueberry picking. The picking was a little damp, but we didn't get hot, dehydrated, or sunburned. And this is the Willamette Valley, so we are used to the damp. The bushes were laden and it was a fun and successful adventure. Rest assured that regardless of what else happens, there will be more pie at this house.


Many of the berries will be dehydrated and frozen. Leftover freezer berries from past years and some berries from today found their way into the jam pot.


After canning nine jars if plain ol' blueberry jam, I decided that diversity is the spice of life. So I added some ground cloves, ground ginger, and chipotle peppers to the pot. This came out fabulous. I think I have a brother and fellow canner out there who wants s PB&J sandwich with this concoction.

All in all, 15 more jars of jam and all the freezing and drying, and we can call this a good canning day.

And if anyone is interested, here is the approximate recipe I created for the

Blueberry-Chipotle Jam

To one standard blueberry jam recipe

add

2 tablespoons ground ginger
1/2teaspoon ground cloves
1-3 tablespoons chipotles peppers in adobo sauce, ground smooth.

Start with a small amount of the Chipotle and adjust the spice to taste and heat desires. Remember that it is easier to put spice in than take it out!