Showing posts with label art. Show all posts

Sunday, January 8, 2012

52 Artful Thoughts

Starting out - the card for week one.
One of my projects for 2012 is more Art. I am a better person and a better mom when I take a little time to create. I also am more likely to create if I have some structure around that creation. So I made up a project for the year - a weekly piece of art.

Stove hood with card in place.
But not just a piece of art. I will be illustrating a prayer/quote/inspirational sentiment each week, something that I would like to meditate on. I'm doing this as an Artist Trading Card (3.5"x2.5") and I took a plastic card holder, added a magnet, and can hang my card up weekly on the stove hood. I will see it as I clean and cook - both excellent times to let my mind wander to meditations.

I think, busy though I am, that I can commit to doing at least one small piece of art each week. I started two weeks ago so that I could hang the first thought on New Year's Day.

I am getting a lot of my quotes from Gretchen Rubin's wonderful Happiness Quote of the Day (the subscription option is at the bottom of the post). I also am on the look out for other inspirations and prayers, that I assume will come when I need them.

Card for week two.
Some weeks I will probably do two cards, so that I have one made for weeks we are traveling, or should other adventures overtake us. I hope to end the year with a box of 52 artful thoughts and meditations.

Monday, October 31, 2011

Mindful Monday: Fifteen Minutes Again!

Last week's Mindful Monday post was such a success! I got a lot done in my art room, and restricting myself to the 15 minutes made me really want to get back into it the next day. I got a lot done, but there is still more.

I also tempered my work time by getting to a couple of easy, niggling craft tasks as I came across them. This had a double benefit - it broke up the time nicely, giving me small reminders of why I so badly want this space functional and getting a couple of things done meant having a couple less things to find a home for as I organize.

For this week - I'm having anoutehr go-round of this task, to see how much more I can get done! 

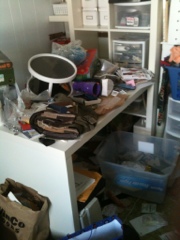
Look! You can almost see the work table!
Who: Me
What: Fifteen minutes of cleaning everyday in my art room.
Why: To get 'er done.
How: First thing after Sister-Bug goes down for her nap, bust in to the space for fifteen minutes no more, no less. Last week I focused on clearing space for the future work of sorting and storing. That meant a lot of just picking messes up and boxing it for later organizing. This week, I want to focus on clearing out some of those boxes of chaos. I also want to make the "work box" drawers that I have for the kids accessible and functional. I think if they are,  I can have a little more time in my room...

I'm gonna get this done, I swear. I probably will have it all nice so I can mess it up well and good in Holiday preparations.

Monday, October 24, 2011

Mindful Monday: Fifteen Minutes A Day In My Room

I have a room of my own in this house - its for my art supplies, herbal products, sewing work, and the kids school supplies. But regardless, it is mine and it has a door. The only thing is that I don't use it. In the way of many things in life with small children, my room was the lowest on the list to unpack when we moved. And it still lingers in a state of semi-unpacked, catastrophic mess.

What the challenge looks like...
I've been hoping and waiting for a weekend day when I can really absorb into the room and do some crazy unpacking, but... Well, I've been waiting for six months. It's become a looming, awful task, a mess beyond belief, and I've been just keeping the door closed.

No more!

Who: Me
What: Taking a page (not literally) out of Gretchen Rubin's blog about tackling difficult tasks, I commit to spending fifteen minutes each day, organizing and clearing my space. In seven days that is almost 2 hours, so I should be able to get something accomplished.
Why: Above and beyond what I stated previously, the holidays are coming. I don't have a mountain of crafting to accomplish, but it sure would be nice to have a space in which to work on the little I do need to get done. And, space to work aside, I'm just bloody sick of the mess! The rest of the house is so consistently tidy that my room haunts me.
How: For fifteen minutes - hopefully during Sister-Bug's nap - I will delve into my art room, set a fifteen minute timer and clean till it beeps. No more, no less.

Here's to success and a clear work table!

===

Additional notes: The laundry design is going well, and I plan on posting more about that soon. It's working its way into my weekly housekeeping schedule, which will be for the best.

I missed the Mindful Monday last week - I had it mostly written. It was about holding normalcy and rhythm in a week of chaos. But the day, the week, was just too busy to post at all last week. I was more focused on getting the kids through a crazy week, with some of their routines intact to do much writing.

Wednesday, October 19, 2011

Foot Print Ghosties

We made these guys the other day, when Brother-Bug wanted to decorate for Halloween. They are delightful, so easy, and super cute.


Trace your child's foot on sturdy white paper. Cut out the tracing - it should be an obvious ghost shape.

Draw eyes and a mouth.

We hung ours on white sewing thread in the window. They could also be nice cards, put together with crepe paper to make a banner, or???

Tuesday, October 11, 2011

The Belated Birthday Post

Brother-Bug turned 5 a month ago today. We were in Seattle with his Godmommies for the celebrations. Papa-Bug was supposed to bring a box with him when he drove up to meet us on Friday. In said box were 'Cars' cake decorations, the cake pans, the birthday banner, our special birthday plate... oh yeah, and all the presents. He didn't bring the box. Whoops.

My plan had been to make a 2 layer cake, and frost it with a road, then drive our 'Cars' toys all over it, as three-dimensional decorations. But the toys were at home and the cake had to be made.

I ended up doing this:

Take one blank white sheet cake...


Trace out the basic outline with a toothpick, and start to outline it with the red icing. Choose not to think about the chemicals and dye numbers that made that icing so very red.

Red - completed. On to the details!

Headlights, eyeballs, and etc.

Finish off with black outlines and other decorations.
 I have to shout out a tremendous "THANK YOU!" to whoever put the drawing instructions online. That was a real life saver in the midst of a very quick plan-change. We added some candles, including a glittery number 5, and had a great celebration. Brother-Bug was thrilled that he had a Lighning McQueen cake. And I was (am) pretty darn proud of myself for pulling it off so nicely.

Ready, Sing, Blow!!!

Tuesday, June 14, 2011

The Edible Color Wheel

Mixing play-doh last night with the Brother-Bug reminded me of an awesome project he and I did last fall. We made an edible color wheel.
Brother-Bug surveys the results.

Supplies:
*Books about color
*Sugar cookie dough
*White frosting
*Food coloring
*spoons, spatula...
*Paper
*Markers (Primary and secondary colors)

What we did...

We talked a lot about color, read art books, found colors in nature and everywhere else, identified hot colors and cool colors and got really immersed in the world of color.

With the sugar cookie dough we made a big round cookie - we made the dough from scratch, but there is no reason you couldn't use a pre-made dough. We rolled it out into an approximate circle, and cut another circle out of the middle to make a wheel. We baked it.

While it was baking and we waited for it to cool, we drew a color wheel with our markers. We looked at how orange is between red and yellow, how red is the compliment to green because it is directly across the wheel, and so on.

Once the cookie was cool, we got our white frosting - we used pre-made white frosting, but you could make your own if you want to. We divided the frosting into three piles and we used regular food coloring to dye each pile a primary color - red, yellow, and blue.

We took half of each pile and applied it to our cookie, taking care to leave space for the secondary colors. Now we had a primary color wheel.

You can guess where we went next - we used our remaining primary frostings to mix the secondary colors and added them to the wheel. All the while we are, of course, talking about color, asking questions, finding answers, and making observations.

When we were done... Voila! A beautiful desert with information to share with the Papa-Bug when he got home from work. We all got to pick which color we wanted a piece of.

Pretty! And Tasty!

Friday, June 3, 2011

The New Nutrition Symbol

It's a plate! NPR reported that the out-dated and unwieldy pyramid is out and the plate is in.

To my eyes, this makes a lot of sense. After all, we usually see our food on a plate and so this makes it easy to see if anything is missing. I also really like the broad categories. It's going to be hard to lobby any specifics into this baby. Meat lobby? You've got a whole protein category right there, Ditto to you, soy lobby. Lots of fruits and veggies, and a reduction of grains. Also good. The proportions are good too - more veggies and grains than proteins and fruits, and just a cup of dairy to the side. It doesn't have to be milk - it could be a cup of cheese to sprinkle on everything.

In fact, this plate is very similar to my concept of The Three G's.  I hope this makes meeting nutritional requirements easier on parents. I personally think it makes it more like an art project when serving up - arranging plates to cover all your bases could be fun. Actually, it is fun! I do it with my Gs all the time. Making attractive, colorful, diverse meals is an artistic delight. Which makes cooking less of a chore and more of a game.

I like games.


===
I just learned about Reverse Graffiti. This is brilliant. I am totally thrilled. Actually revolutionary, in my opinion.

Thursday, May 5, 2011

Invitation to Help Japan - Tomorrow May 6th!


To Anyone Reading This -
The recent tragedies in Japan have shocked and saddened us all. While spared from personal tragedy, we nonetheless pray for those who are rebuilding their lives and country one day at a time. I was contacted by an artist friend who has spearheaded a “Helping Hands for Japan” art auction. The photo you see above are tracings of my hand and my 4-year old's hand, which we worked together to paint. These hands, along with more than 80 others from all kinds of artists, will be auctioned off this coming Friday, May 6th. All proceeds of this online auction are going to aid the efforts of the Red Cross as they work to help those in need in Japan.

My son made his hand with the knowledge that he would be helping the people of Japan. Most particularly, he is concerned that they get the sushi restaurants fixed so he has somewhere to eat when he goes to visit someday!

Please check out the Facebook Page where you can see the amazing art work that artists have been inspired to make for this event. It is truly amazing and heart warming. Please consider dropping by the online auction and bidding for a hand. Spread this invitation far and wide, to anyone you think might be interested. Every one can lend a hand.

Sincerely,
Another Mom and Her Little Boy